BREAKING NEWS

Friday, June 28, 2013

Second key modelling concept

--> The second key modelling concept covered here is spacing your geometry uniformly. This will give the most predictable surface possible when  subdividing your creature's geometry. Subdividing can occur not only while modelling, but also when refining subdivision surface, when applying a polySmooth, or when the model is subdivided by the renderer at render time.

The advantage of having uniformly spaced geometry with a higher poly count are far greater than a mesh that has irregularly spaced geometry and less polygons. an evenly spaced geometry will also make the rest of the character pipeline much easier. Texture artists will experience a minimal amount of texture stretching on a surface that has uniform spacing compared to irregularly spaced geometry.
Character set up artists will have an easier time binding the model due to evenly distributed weight values to uniformly spaced geometry compared to geometry with irregularly spaced rows of edges.


Stone Texture

Free stone texture


hERE  is free texture from videotutorialmaya free stone texture

Thursday, June 27, 2013

Key Modelling part 2

--> Part 1

To avoid geometry bunching up around the armpits, the human;s upper torso should be modeled a little differently than how it naturally flows. It is a good idea to have the edge loops flow along the pectoralis muscles into the deltoids and then to the back like a cape. This cape layout has the potential of deforming extremely well when the arms reach above the head and when they are in relaxed position.

In the following image, they are many directional changes around forearm, biceps and triceps. The trick is to try  to build enough of  these muscles without the arm being perfectly anatomically correct. Some areas are implied rather than built to keep the geometry efficient and uniformly spaced.


and now modelling a leg

Modelling the leg muscles is a good exercise for determining which muscles to build and what you can get away eith. You can imply good portion of the muscles just by sculpting with artisan since most of the leg muscles travel vertically. Always evaluate what needs to be modeled and what does not. You should only concentrate on modelling what will pay off in the final render.

Good topology

-->

The third key modelling concept covered here is to maintain quad topology as much as possible by doing so. it benefits you and everyone in the character pipeline for many of the same reasons as listed above. Quads benefits the modeler by getting a predictably smooth surfae when subdivided, they benefit the texture artist by securing the texture placement and minimizing stretching and they allow the set up artist to evenly distribute or paint weight values to quads rather than triangle or n- sided polygons


There will be times when you will have to sacrifice one ot more of these key concepts in order to maintain a quad layout, especially when modelling according to anatomy and muscle flow. It is then up to modeler to decide to do discontinues some of these extra edge loops by using triangle on the mesh.

Following are some typical problems encountered while modelling , along with solutions to correct the topology with quads. Once the topology is corrected, you can use tools such as artisan to smooth out the edges and get a seamless result.

If you do have triangle on your model, make a conscious effort to hide them in unobtrusive places. N-sided polygons are not recommended either and should be split manually, since it is difficult to predict exactly how the surface will react when subdivided, textured or bounded; it might ultimately flicker when deforming during animation.


Wednesday, June 26, 2013

floor texture


How to open Script Editor in Maya

-->

First Select windows on up ---> General editors --->  Script Editor
In the Script Editor, turn on the script --> echo all Commands option.
Redo the last step in order to see the MEL command used.
Doing so display all the hidden commands executed, this giving you acces to the Select EdgeRing Command if you so
- Make sure turn off the Script --> Echo all commands option when you  done
- If you want , you can highlight and MMB-click+drag the command to your shelf for later usage


How to Texturing the model Part 1

-->

Now that you have a property unfolded model, you are ready to paint the texture maps, There are several ways to doing this, such as exporting the model in a 3D painting software, but perhaps one of the simplest ways to texturing human is in paint program such as Adobe Photoshop

In Order to know how to paint the model and where the details of the geometry are in  a paint program.
You need to export a UV snapshot, which can be used as reference to paint on.

1, Export a UV snapshot
- With the biggest geometry still selected and visible in the UV Editor , select polygon--> UV snapshot.....
- In the option window , browse for your current project's sourceimage directory
- Set the followingL
Size X and Y to 512;
image format to TIFF
- Click the OK button
An image file is now written to disk , allowing you to paint on it and the use the resulting image as a texture.

Part 2

Tuesday, June 25, 2013

Free Cable texture

-->

Here.. if you look for free texture.. pplease comment below.. so next post i will find for your requet...
Free texture 

How to texture model Part 2

-->
PART 1
2. Using a PSD (Adobe PHotoshop) texture
as an alternative to the UV snapshot, you can use Adobe Photoshop (PSD) file textures.
- Press F5 to change to rendering menu set.
- Select the geometry that you wish to texture . then select Texturing  --> create PSD network.
 An Option window will displayed
- In the Attribute section, select the different channels that you wish to be accessible for painting and click on the  > button
- Click the create button
 A PSD file is now written to disk , allowing you paint on the different chosen channels and include UV snapshot.

3. Paint the texture
Open the file created in the previoussteps and start painting the model's textures

4. Textures back in Maya
Once you are done painting the texture, import them back into maya and see the result on the 3D model, The following image shows the human's head displacement texture.


reference image


How to set Image Plane

-->
One of the benefits of something time designing your model before beginning in 3D is that you can draw reference images to establish proportions while in default pose. Doing so helps model the character. SInce the poses can be displayed using image planes in the maya viewport.

Following are three reference images that will be used to model the human. Notice that they are proportionate altogether in order to facilitate the modelling while looking through the different Orthographic views.

1. Start a new scene
You will now import the front,side and top reference images as image plane in maya software.
- select file --> new scene.
Do not manipulate any of the cameras.

2.. Importing the image plane.
-in the perspective view select panels ---> saved layouts --> four View.
- In the front view, select View --> image plane --> import image.,

Doing so will open a dialog box to browse for the image plane.

=selectthe image human , and click the open button.

The image plane is shown in the front view
-Repeat the previous steps in import the side and top iamges for their respective cameas.

3. Placing the image plane
Now that you have the image planes in your scene, you will need to plave them correctly in order to be able to start modelling.
- In the front view, seect view--> image plane--> image plane attributes--> imageplane1.
The attribute editor will display the image plane's attributes.
-under theplacement extras section, set center z to -20
- set top view's image plane's center y to -20
- set side view's image plane's center y to -20

Free sky texture


Here we are.. we have a sky texture free sky texture.. for you from videotutorialmaya.blogspot.com

Key Modelling concept part 1

-->

Before you begin with the creature's topology, there are a few key modelling concepts to keep in mind.
First, you must concentrate on modelling according to muscle flow.

It is suggested to have anatomy books with you for quick referencing, Even if your model is not real, you will most likely be able to extract basic organic concepts to reproduce on your model.

When you model according to your character's muscle flow, your edge loops will help maintain the location of your muscle, which will give a more realistic look when deforming. When modelling organic character, you should first concentrate on laying out the necessary edge loops for the muscles; once you are satisfied with the topology , you can proceed to sculpt the surface with tools like the soft modification toool and the sculpt Geometry tool.
This way, you can concentrate on the aesthetic valus of the sculpture and not worry about technical issues.


Part 2

Sunday, June 23, 2013

illumination tutorial in maya

Hello everyone in this tutorial we will make an illumination of a room which illuminated by sunlight coming through a window (usually for kitchens and bedroom)
In this tutorial we will use 2 different kind of lighs.
1. " MR spot light"
2. The photometric 'free area light'
In this tutorial we use "mental ray" as render engine.
Mental ray is very stable render engine and allows to have very realistic renderings.

The first light (mr area "spot light") must be located outside the box (room). and move the target of the spot light through the window
and place it inside the box (room)
lET'S SEE a few settings.
check "shadows on" and select ray traced shadows.
in spot light parameter u have the possibility to make the shadow softer increasing the size (hight,width) of light.

So how we can make more realistic our rendering?..... let's go to the "render scene panel" make sure you use mental ray for render engine
then choose indirect illumination.
Now check the final gather box. put a low number in the samples slot (50) to make a quick test rendering and see the difference. for higher quality you must increase
the number in the samples.

Saturday, June 15, 2013

Make a fake iris refraction 3d

The difficulty of realistic eye refraction done using real bent rays and raytracing in a shading model is not its ability to look real; instead. The problem is that it is near impossible to be previewed by the animator, who is the one setting the exact position of where the eyes will be looking.

The possibility exists to realistically fake the eye refraction directly in the scene, using simple deformers and some vector product nodes. This is possible since the eye is basically a spherical surface, and it is fairly easy to convincingly fake refraction through the tip of a round object such as the eye. Since the eyeball geometry is two separates surfaces, it works by simply using driven blend shapes and sculpt deformers. which are driven from the dot product and angle between the eye to camera vector and some simple weighted vectors that fall in-between. The mirror across the eye vector is also useful for deforming the geometry on the other side of the other side of the eye where it may have some intersection problems with the outer eye surface.

Friday, June 14, 2013

Modelling clavicle Tips

Modelling clavicle Tips
clavicle 3d

Think of the clavicle as part of the arm and create is as one entity continuiting into the hand. As difficult as hip placement is. The shoulder is much harder. So many things are going on in that region during deformation, and there are a number influences you need to watch to achieve just one simple pose like moving the arm up aod won. Finding the correct shoulder joint placement is very important. To help you do this. You may wish to create a few joints, bind the skin to them, and then test rotations just to see if you have it right

Then , as if the shoulder is not complicated enough, you have the elbow, hand and fingers. The amount of work necessary for the hand, finger and wrist area is about the same as it takes to do the entire rest of the body

Thursday, June 13, 2013

Example pose 3D

-->

Here is the example of pose to your own 3D model. for lady like this .. or How to show your portofolio a rendering one and a  wireframe one..
i hope it's helping


Human Skin Texture

diffuse map
color map texture
Color map skin

Bullet texture

Bullet texture

free texture

texture


Clothing texture


Armour texture


Wednesday, June 12, 2013

Material Parameter

Material Parameter

Diffuse 
usually used for the base color material objects, such as wood, plastic, etc.

Reflection/mirror
The resulting mirror-like reflection of surrounding objects, so objects appear more lustrous. such as stainless steel, new flooring in a mop, iron ball.

Refraction
Objects using this material will look transparent but the results will be distorted as melihattongkat included in water

Bump
Objects using this material will look rough and arise such as concrete, rock, carpet, hill, land, etc.

Opacity
object will be transparent in certain parts used to manufacture pohom. cloth, cages etc.

Displacement
Objects using this material will look grainy and low surface height difference occurs. This material only works if there Displace Mesh modifier. This material is used to make the asteroid, hills, sea, texture spacecraft etc.


Tuesday, June 11, 2013

How to make a gold In Autodesk Maya

-->
How to make a gold In Autodesk Maya
1. Open your Autodesk Maya 
2. assieng the object to Blinn material
3. Here is the material setting for Gold
   The type of Material is Blinn
   Eccentricity = 0.300
   Specular Roll Off 0.300
   Specular color = yellow (just like a gold)
  Reflectivity = 1.000
  
Here is Important
  Make sure u have a HDRI image ,just search on google
 if youalready have that
klick on right square on Reflected color  and choose EnvBall
in envBall image insert your HDRI image.

The important thing is Reflected Color, and these are a simple tutorial to make a gold material

And if you render with mental ray, u better use a mental ray material. because mental ray make a different material i think it's have a reason

Please contact me if you feel you have a question


Saturday, June 8, 2013

Modelling theories

-->
Creating the perfect creature on paper even sculpting it in clay before you sit down in from in front of your computer is often times unfeasible. Moreover, digital models, just like conceptual drawings and macquettes, will often go through multiple revisions. Sometimes there will be technical revisions, such as changing the topology of your model to better match the underlying muscle structure or wrinkles of the skin, or even aesthetic changes, like revising the overal structure and anatomy of the character.
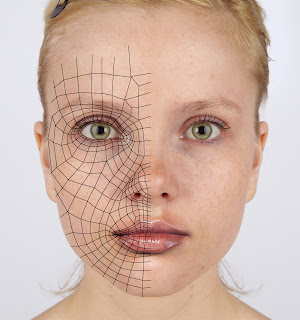
main edge lines based on underlying muscles
The first step you will take here is to plan out the necessary edge rings for it to deform and animate as you would expect. It is a good idea to do this on paper first ang then 
use your drawings as guide when modelling. Or, you can take your reference photos and draw the mucle flow on top of it as shown here 

Seconf d, you should use the maquette photographs as a starting point for your digital model. it is common to start modelling from relaxed default pose, but in the image above the shape is quite extrema. Some belive it is easier to drop the jaw from the default pose rather than close the jaw from the open pose. 

The main advantage of modelling a head at its most extreme pose that you are guaranteed that all of the necessary geometry to achiece that particular facial expression will be inserted, Then you can simply reshape it back to relaxed closed mouth in the final model and use the extreme pose as a blend shape. If your model the closed mouth head first , you may end up modeling not enough geometry to begin with and then you are struck with a head that is noot expressive as your first envisioned.

If you decide to sculpt the exrtreme pose first for your creature , it is highly recommended that you drwa out exactly what your closed mouth face will look like, if you don't do this, you may besurprised to find that your creature looks different than you hoped. When you close the beast's mouth for the first time, it will require aesthetic adjusment to his jaw and lower face, but since you have planned for this , all you will need to do is follow the concept drawings of the closed mouth beast.

Friday, June 7, 2013

Preparation before rigging (part 2)

-->
The character Preparation

Before you sit down at the computer. It is recommended to work things out on paper first.
Take some orthographic drawings or screen grabs of the model, print them out, and draw rigging ideas on them.
Draw muscle groupings and skeleton locations, take note, etc. Show the drawings to your coworkers ang get their input. Make yourself familiar with the creature as possible. it will save your time in the long run if you work out a number of issue on paper.


The last thing you want to do before you start rigging the creature is check the model for anomalies or issues that may hinder your workflow later.

A major thing to llok for is. If there any holes or seams in the character model. Holes and seams may be needed for various creatures, but when
it comes  to weightng they can bring up difficulties. If a hole or seam is needed for the particular creature, the best bet would be to have two sessions of the model, one model that is completely water tight and continous, and one that is broken up or seamed. This way you can first bind the seamless creature and paint weights without too much of hassle, then copy those same weights to the broken up model. THis should save some headaches down the road.

Another thing to watch for is the flow or edge or isoparms of the model. To do so , turn On the wireframe om shaded display mode and just look at the model's topology. Look to see if the flow od lines follow major muscle groups, If the definition of the creature is correctly displayed wighin and if the flow allows for good deformation in the end. This may not be very easy to see in the beginning. but with time and experience you will be able to simply look at model and see which parts of it will deform well or not.
 
Copyright © 2014 modelling, texturing, rendering, animation tutorial. Designed by OddThemes | Distributed By Gooyaabi Templates